Get your Kit......Off!!!
- footballclubse7en

- May 10, 2020
- 5 min read
Updated: Jan 24, 2021
You know what sort of kit you will need
Have an idea what surface you’re on
The boots you need for that surface
The sites to do your armchair shopping
Now you need to keep it all in pristine condition. Soccer kit is a little different to normal clothes, there’s a few tips we can give you, and let you know of the big NO’s NO’s too. We’ll cover your base kit of t-shirt, shorts and socks and then move onto boots. Other peripheries, just use your common sense eh…….was gonna mention Frodo and Cosby but there’s a lot more in our squad than this should apply to!

If you’ve listened to our advice so far, you may have got a lot of your wearing gear on the cheap, but that doesn’t mean they are physically cheap. They will still be made of the best materials, so try your best to keep them in tip top shape. It’ll make you feel more confident, easier on your wallet and believe it or not………stories, nostalgia, superstitions will all come to be attached to your kit over time.
Shirts and Shorts: Shirts and shorts will often be the same material, so follow the same instructions for them. Socks are slightly different; we’ll cover them next.
Some of the pics above might scare you, but don’t worry too much. Playing on AG, will mean that mud and stains won’t be so alarming. The first thing is to put that shirt and shorts into a sink of warm water (a small amount of detergent is optional). I know you’re knackered, may have been to the pub, but the quicker you dump them into warm water, the quicker the cleaning begins. The longer you leave it, then the less chance you will have of getting rid of those stubborn stains and increasing the risk of long-term damage to your gear.
You’re looking at 30 mins to 3 hours given your circumstances, the longer the better, but watching an episode of Eastenders is more than enough, if you make the water slightly hotter than lukewarm.
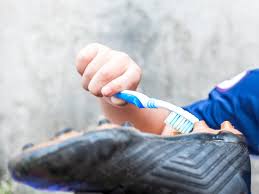
A spare toothbrush is really useful here too. You can purchase specific tools from places like Unisport if you have that budget but they do very much the same. Using one can help with some of the chunkier dirt but don’t go too crazy, be delicate.
After the soaking, you can chuck your shirt and shorts into the washing machine. Usual rules apply here, don’t mix up colours unless you want your favorite Real Madrid shirt to come out pink. If you have the opportunity, try to just keep your kit as a separate wash. The heat at this point is critical. Most people will say nothing more than 30 degrees. I prefer way less and if you have the setting then a cold or woollen wash is safer. But its personal preference. I’d stay cold, then up it to 30, if you’re not satisfied. But NEVER above 30.
Before chucking them in, be sure to turn them inside out too. It will help with the logos and any personalised names/badges you may have on your shirts.
Once the washing machine has done its job, hang your kit out, in fresh air wherever possible. But a normal hanger or holder will do the trick. Avoid radiators or high heat sources and don’t try to save time by using a tumble dryer, unless you want it shredded.
KEY POINTS:
- Soak for 30mins at least beforehand (use a toothbrush for stubborn stains)
- Never use bleach
- Turn kits inside-out
- Don’t overfill the washer
- Avoid mixing colours.
- Dry in natural air, but never a tumble dryer
Socks: These are made from a material to shirts and socks. Chuck them in the same soak as tops and shorts but when it comes to washing machine feel free to put them in with the rest of your washing. Keep the heat low (the elasticity can be destroyed in very high heat), and they would benefit from a bit of fabric softener. The same applies to any headbands and wristbands
Shin Pads: Remember the toothbrush. Use this…….your pads should of mostly been covered for most of the game, so shouldn’t need any washing. A quick once-over with the toothbrush and a quick rinse followed by some airing outside.
IRONING: this is fine, just be careful and don’t get too aggressive. If you have badges or naming (especially the plastic type) then skirt around these parts. Iron them inside out too (which should still be the case if you listened to us from early!

BOOTS
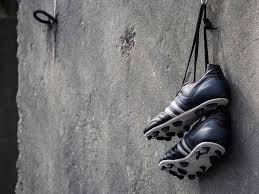
Footy boots…….I think there’s something sacred about them. It’s more than that feeling of pride when you buy a pair of trainers or shoes. They are just for show. Boots are for the game. They will be principle actors/actresses for your story, and some great memories will be made. So let’s look after them.
First things first, give them a good stamp on the floor while you’re wearing them, and walking off the pitch. If its grass, it will get rid of the bigger chunks of soil. I know we are all lazy, but untie those laces and don’t kick the boots off via the heels. It damages them, maybe not obviously at the beginning but you’ll see after a year, whether it was a good idea!
Once you take them off, before chucking them in your bag, shake them around and make sure you get as much of that sand and black rubber infill out as possible. It’s a 5-a-side legend, that there will always be some of that infill appearing on your carpet at home so don’t worry too much!
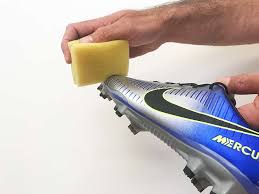
Run them under a tap or a hose if you’re lucky to have one and then stuff them with newspaper or old footy socks and let them dry naturally.
AVOID: using heat to dry them quickly, chill dude. So avoid hair dryers, radiators etc. The strong heat can deteriorate the leather or adhesives that hold the boot together and can-do damage to the soleplate and studs be they SG, FG, AG or TF boots.
Afterwards, there are a variety of products you can use, especially for leather. Me personally, think this is overkill, I’d like to see tests on longevity before shelling out the extra moola for stuff like this. I would avoid any oil-based products if u do!
Finally, one question asked is if footy boots are okay for the washing machine. Yes, most if not all, modern day boots can live with the odd the machine churn. Keep them separate from anything else, make it a cold wash and pack the boot with old socks. Anything higher than 20 degrees or too fast can rip the boot apart. If you have an unusable pair of trainers, test with them. Otherwise, hand washing boots is the safer option.
For boots and any white materials, bicarbonate of soda is useful. A worthwhile purchase in my eyes and you only need less than a third a teaspoon so it lasts forever. Bicarbonate really whitens things like shirts and shorts (when u soak them) and for boots, they can help with laces, if you remove them and the overall sheen of the boot. They also seem to dispel odours too.
Afterwards, it’s mainly common sense. Odour neutralisers can be stored inside the boot prior to your next games. Keep them well aired and if possible, keep the interior well packed, as it helps to keep its shape. I have my boots on display on my chest of drawers (you may have seen the pictures before) so this does the double trick, of making sure they are ultra-clean….and are aired properly.
Think that’s everything, but please feel free too add any tips of your own. Remember that your kit is the same as workman/woman’s tools. Look after them and they will do you proud!


Comments